Geocoding with the HABS/HAER/HALS collection#
This notebook covers an introduction to geocoding, using the Historic American Buildings Survey/Historic American Engineering Record/Historic American Landscapes Survey (HABS/HAER/HALS) collection.
The goal of the notebook is to become familiar with the geocoding process and to encourage interaction and exploration with the data. We will cover:
Version#
Version: 1
Last Run: Jul 16, 2025 (Python 3.12)
Author Information:
Written by Sabrina Templeton, Junior Fellow 2025
Prerequisites#
Files that need to be downloaded and placed in the same folder as this file prior to running (if you have cloned the repository you can skip this step):
complete_geocoding_results.jsonRuralurbancontinuumcodes2023.csv
Packages that may need to be installed, this can be done easily with pip install [package]:
geopyfoliumpandasplotlyrequests
Imports#
First, let’s take care of some imports we will need later, and then we can dive a bit more into the background for this project. Note that some of these imports may require packages to be installed into your Python environment, as detailed above in the prequisites section.
from geopy.geocoders import ArcGIS
from geopy.distance import geodesic
import folium
import json
import pandas as pd
import plotly.express as px
import plotly.graph_objects as go
import random
import requests
import statistics
import time
Background#
The HABS/HAER/HALS collection consists of drawn records and photographs of over 46,000 historic buildings, engineering structures, and landscapes across the United States. You can read more about the collection here.
Some items in the collection, like this one, have coordinates listed under the Latitude/Longitude field. These coordinates were added to the collection by the National Park Service. Having coordinates for these collection items allows us to do things like map them, which can be helpful for anyone looking to explore the collection in a more interactive way.
Let’s take a closer look at one of the items by fetching the json record from the library’s API:
item_response = requests.get("https://www.loc.gov/item/nj1025?fo=json")
item_response.json().keys()
dict_keys(['articles_and_essays', 'cite_this', 'item', 'latlong', 'more_like_this', 'options', 'related', 'related_items', 'reproductions', 'resources', 'thesaurus_entry', 'timestamp', 'unrestricted'])
The response itself would be quite long, but looking at the keys gives us a sense of the shape of the response. A lot of relevant information is nested within the item field. The coordinates for the item are conveniently accessible through the latlong field. Let’s take a closer look at the shape of the item field:
item_response.json()["item"].keys()
dict_keys(['_version_', 'access_restricted', 'aka', 'call_number', 'campaigns', 'contributor_names', 'contributors', 'control_number', 'created', 'created_published', 'created_published_date', 'description', 'digitized', 'display_offsite', 'extract_timestamp', 'extract_urls', 'format', 'group', 'hassegments', 'id', 'image_url', 'index', 'item', 'language', 'languages', 'latitude / longitude', 'latlong', 'link', 'location', 'location_str', 'locations', 'locations_str', 'lonlat', 'medium', 'medium_brief', 'mime_type', 'modified', 'notes', 'online_format', 'original_format', 'other_formats', 'other_title', 'part_of_group', 'partof', 'place', 'raw_collections', 'related', 'repository', 'reproductions', 'resource_links', 'resources', 'rights', 'rights_advisory', 'rights_information', 'score', 'shard', 'shelf_id', 'site', 'source_collection', 'source_created', 'source_modified', 'subject', 'subject_headings', 'subjects', 'thumb_gallery', 'timestamp', 'title', 'type', 'unrestricted', 'url'])
To avoid sifting through the entire response for the information we want, we can specify in the request to retrieve specific fields:
sample_id = "nj1025"
response = requests.get(f"https://www.loc.gov/item/{sample_id}?fo=json&at=item.control_number,item.title,latlong")
initial_example_item = response.json()
initial_example_item
{'item.control_number': 'nj1025',
'item.title': 'Bayonne Bridge, Spanning Kill Van Kull between Bayonne & Staten Island, Bayonne, Hudson County, NJ',
'latlong': '40.644187,-74.141269'}
Another thing to note here is that the ID that we use to fetch the item–sample_id, above, is the same as the item.control_number that we are getting back. This ID may also be referred to as the HHH ID, and it is unique within the collection–knowing the HHH ID for an item is all we need to fetch more information on it, so it’s good to keep track of. Note that while the use of the item.control_number field is consistent in this collection, items in other collections might use the item.id field for their unique identifiers instead.
Moving on, here’s an item without any coordinates for comparison:
item_response = requests.get("https://www.loc.gov/item/pa1462?fo=json&at=item.control_number,item.title,latlong")
item_response.json()
{'item.control_number': 'pa1462',
'item.title': 'Hopewell Village, Furnace & Bridge House, State Route 345 vicinity, Hopewell, Chester County, PA',
'latlong': {}}
In total, the HABS/HAER/HALS collection has over 9,000 items with coordinates! We can also supplement this by fetching another ~3,000 coordinates from Wikidata–the process for this will be demonstrated later on in this notebook. While having over 12,000 coordinates is certainly a great start, that leaves around 34,000 items in the collection for which we do not have coordinates. Which brings us to the primary question driving the project: is there a fast, computational, and accurate way to come up with these coordinates? Well, let’s dive in:
Geocoding#
The process for finding coordinates based on an address is called geocoding. For more background on what geocoding is, this Wikipedia article provides a good overview, although since there are many helpful geocoding tools, an in-depth understanding is not necessary to embark on the process!
For this project, we’ll be utilizing the geopy library, which provides convenient access to multiple geocoders. To keep things simple for this tutorial, we’ll stick to one geocoder tool (the Esri ArcGIS geocoder) and utilize it throughout this notebook:
geolocator_arcgis = ArcGIS()
Initial Example#
Here’s how we might geocode one of the items we just fetched, using the title as a stand-in for the address. Note that this is just one method of geocoding, and using the title is an unconvential choice, since the geocoder expects only a typical address. Here is the title we are providing:
initial_example_item["item.title"]
'Bayonne Bridge, Spanning Kill Van Kull between Bayonne & Staten Island, Bayonne, Hudson County, NJ'
Now let’s see what coordinates the geocoder will generate:
initial_example_item_location = geolocator_arcgis.geocode(initial_example_item["item.title"])
generated_ll = [initial_example_item_location.latitude, initial_example_item_location.longitude]
generated_ll
[40.647927824401, -74.139691043765]
And check the associated address that the geocoder returns:
initial_example_item_location.address
'Bayonne Bridge, Bayonne, New Jersey, 07002'
That looks promising! For a more precise view of how accurate the geocoder coordinates are, and since we choose an item from the collection which we already have coordinates for, we can calculate the distance between the known coordinates, which we got directly from the library API, and the ones we generated:
distance_from_original = geodesic(generated_ll, initial_example_item["latlong"])
distance_from_original.km
0.43632273129283644
Okay, so we were about .44 km off. Not bad–that’s just under a third of a mile. But let’s take this back in context for a second. If this item were say, a historic house in NYC, that third of a mile difference might put the generated location several blocks off from the original location. However, in this case, the item is a bridge, and according to the Wikipedia entry for this bridge, it’s over 1.7 km long, so the difference in coordinates here is very likely just different spots on the same bridge.
These kinds of specific contextual differences in what it the distance between original and generate coordinates means are important to keep in mind, especially as we start to work at scale later in this notebook.
Less Accurate Example#
In some cases, the geocoding can be much more inaccurate. Let’s take a look at another example:
response = requests.get("https://www.loc.gov/item/pa0840?fo=json&at=item.control_number,item.title,latlong")
less_accurate_item = response.json()
less_accurate_item_location = geolocator_arcgis.geocode(less_accurate_item["item.title"])
generated_ll = [less_accurate_item_location.latitude, less_accurate_item_location.longitude]
distance_from_original = geodesic(generated_ll, less_accurate_item["latlong"])
distance_from_original.km
1480.3901940299127
Okay, the geocoder gave us coordinates that are 1,480 km away from the known location. So, what happened here? Let’s take a look at the title we gave to the geocoder:
less_accurate_item["item.title"]
'Falls Bridge, Spanning Schuylkill River, connecting East & West River Drives, Philadelphia, Philadelphia County, PA'
Now, let’s compare that to the generated address that the geocoder is giving us back:
less_accurate_item_location.address
'East Ave & West Ave, Philadelphia, Mississippi, 39350'
It appears that the geocoder may have had trouble correctly parsing the title, and, as a result, returned an address in Philadelphia, Mississippi, rather than Philadelphia, PA, where the bridge is actually located.
Out of curiousity, let’s try simplifying the information we are passing to the geocoder and see if that helps!
test_location = geolocator_arcgis.geocode("Falls Bridge, Philadelphia, Philadelphia County, PA")
generated_ll = [test_location.latitude, test_location.longitude]
distance_from_original = geodesic(generated_ll, less_accurate_item["latlong"])
test_location.address
'Falls Bridge, Philadelphia, Pennsylvania, 19129'
distance_from_original.km
0.10270692131941384
This new location is within .1km of the known location for this item, and gives the correct address–so the geocoder did a much better job this time! However, while this approach will result in more accurate geocoding for some titles, it will overall lead to less accurate geocoding than providing the entire title. One of the problems with doing geocoding at scale is that it is hard to account for every case. More accurate ways to geocode from the titles may well exist (and we encourage you to try and find some!), but, as we will soon see, providing the title as-is into the geocoder yields decent results.
Geocoder Score#
The geocoder we are using also returns a score, defined in their documentation as “A number from 1–100 indicating the degree to which the input tokens in a geocoding request match the address components in a candidate record. A score of 100 represents a perfect match, while lower scores represent decreasing match accuracy.” Let’s look at the scores for the two items we just geocoded:
initial_example_item_location.raw["score"]
86.27
less_accurate_item_location.raw["score"]
89.3
This score for the first item is relatively low, even though the geocoder performed quite well in that case. And conversely, the score for the second item is higher, even though the geocoder was several states off. In these examples, the scores are not good predictors of how well of a job the geocoder is doing. As we perform analysis later on, we will continue to track these scores to see if there are any notable trends.
Geocoding Austin, TX#
Now, we likely want to be able to look at more than one item at once. To get items from the collection in bulk, we can use the "https://www.loc.gov/collections/historic-american-buildings-landscapes-and-engineering-records" base url. We can further filter this by faceting to a location: let’s try grabbing all the items in Austin, TX.
This is a great place to change some variables and play around with the code below: filtering to the Austin area gives us a small, manageable number of items–which allows the cells in this notebook to run quickly. However, this process could easily be adapted to grab the entire collection, by removing the location filter and increasing the number of items per page–see this documentation for the max recommened number of items per page. If making lots of API calls in a row, it also helps save time to define a session to reuse for each request:
s = requests.Session()
items_per_page = 10
location_filter = "fa=location:austin|location:texas"
all_results = []
url = f"https://www.loc.gov/collections/historic-american-buildings-landscapes-and-engineering-records/?fo=json&c={items_per_page}&{location_filter}&at=results,pagination"
while True:
time.sleep(3) # to avoid hitting rate limits
call = s.get(url)
data = call.json()
results = data["results"]
all_results += results
print(f"Received {len(results)} items from {url}")
if data["pagination"]["next"] is None:
break
else:
url = data["pagination"]["next"]
Received 10 items from https://www.loc.gov/collections/historic-american-buildings-landscapes-and-engineering-records/?fo=json&c=10&fa=location:austin|location:texas&at=results,pagination
Received 10 items from https://www.loc.gov/collections/historic-american-buildings-landscapes-and-engineering-records/?c=10&fa=location:austin%7Clocation:texas&fo=json&sp=2
Received 10 items from https://www.loc.gov/collections/historic-american-buildings-landscapes-and-engineering-records/?c=10&fa=location:austin%7Clocation:texas&fo=json&sp=3
Received 4 items from https://www.loc.gov/collections/historic-american-buildings-landscapes-and-engineering-records/?c=10&fa=location:austin%7Clocation:texas&fo=json&sp=4
There’s no way to specify within the API call that we only want items that have coordinates, so we’ll have to filter the results ourselves after the fact. But first, let’s see how many items we grabbed in total for the Austin area:
print(len(all_results))
34
Now let’s filter for only items with a “latlong” field and see how many that leaves us with:
results_filtered = [item for item in all_results if "latlong" in item]
print(len(results_filtered))
5
A lot less!
These items still contain all the fields, so we can simplify the structure here a bit to focus in on what will be important for this experiment. We’re also going to make it into a Python dictionary rather than a list, which allows us to easily access a particular item later if we want to. The fields we want to keep track of are the latlong, hhh_id, and title.
loc_items = {}
for result in results_filtered:
hhh_id = result["item"]["control_number"]
title = result["item"]["title"]
loc_items[hhh_id] = {"latlong": result["latlong"], "id": hhh_id, "title": title}
pd.DataFrame(loc_items).T
| latlong | id | title | |
|---|---|---|---|
| tx1001 | [30.30692, -97.77438] | tx1001 | Laguna Gloria, 3809 West Thirty-Fifth Street, ... |
| tx1009 | [30.31553, -97.75898] | tx1009 | Camp Mabry, Building No. 15, 2200 West Thirty-... |
| tx1121 | [30.273651, -97.748102] | tx1121 | Sampson-Nalle House, 1003 Rio Grande Street, A... |
| tx1127 | [30.271058, -97.74736] | tx1127 | North-Evans Chateau, 708 San Antonio Street, A... |
| tx1158 | [30.294118, -97.787094] | tx1158 | Tom Miller Dam, Colorado River, Austin, Travis... |
Now, the above represents all the HHH items in Austin that have coordinates on the LOC.gov site, but there may be more coordinates out there–since a lot of these historic landmarks and landscapes are important enough to have their own Wikipedia entries, we can also try to fetch additional coordinate data through Wikidata. Wikidata calls are done in the SPARQL querying language, which may look a bit foreign if you haven’t encountered it before, but this one is essentially grabbing any items with an hhh_id (convenient!) and coordinates in Austin, TX.
location_filter_string = "?item wdt:P131 wd:Q16559."
The above is another line that you can feel free to play around with if you are running this notebook locally! Removing that filter would result in a query that would fetch all coordinates for HHH items. Another easy way to play around with Wikidata queries is to use their query interface: this link will take you to a live version of the query below.
url = "https://query.wikidata.org/sparql"
sparql_query = f"""
SELECT ?item ?itemLabel ?latlon ?hhh_id WHERE {{
{location_filter_string}
?item wdt:P8655 ?hhh_id;
wdt:P625 ?latlon.
SERVICE wikibase:label {{ bd:serviceParam wikibase:language "[AUTO_LANGUAGE],en". }}
}}
"""
response = requests.get(url, params = {'format': 'json', 'query': sparql_query})
wiki_results = response.json()
print(len(wiki_results["results"]["bindings"]))
1
There are a few things to note about pulling from Wikidata:
It only gives us the
hhh_ids, so we’ll need to go back and make API calls toloc.govto get the titles.The latlong coordinate is formatted as a string containing a
Pointobject, so we need to do some parsing to make it a list.
The following function will help parse the Point strings, which look like come in the form "Point(x, y)":
def process_point_from_wikidata(point_str):
"""
Parses the latlong from the format that Wikidata uses.
Args:
point_str (str): A string in form "Point(x, y)".
Returns:
list: a list containing latitude and longitude values.
"""
point_str = point_str.lstrip("Point(")
point_str = point_str.rstrip(")")
point_list = point_str.split(" ")
# reverse x and y for latlong
if len(point_list) != 2:
print("Error parsing point, ", point_str)
return None
return [float(point_list[1]), float(point_list[0])]
Now let’s work on grabbing the titles. If we already have data for the ID in loc_items, we won’t make another API call, but otherwise, we’ll use the same item endpoint as earlier on and just grab the title to try and keep this process as efficient as possible–these efficiencies are not extremely necessary in this case where we’re just grabbing one item, but if you were to work with a larger scale here this might take a few minutes to run.
wiki_results_processed = {}
for item in wiki_results["results"]["bindings"]:
time.sleep(3)
hhh_id = item["hhh_id"]["value"]
# skip if the id already has an entry in the LOC data
if hhh_id in loc_items:
continue
else:
url = "https://www.loc.gov/item/" + hhh_id + "/?fo=json&at=item.title"
item_response = s.get(url).json()
title = item_response["item.title"]
latlong = process_point_from_wikidata(item["latlon"]["value"])
wiki_results_processed[hhh_id] = {"latlong": latlong, "id": hhh_id, "title": title}
print(len(wiki_results_processed.values()))
1
Remember, this number may be less than the initial number above since we are ignoring duplicates. Let’s combine the two dictionaries to get our Austin dataset!
austin_dataset = wiki_results_processed | loc_items
len(austin_dataset)
6
Now, let’s set up a function to handle the same geocoding steps we had performed above so that we can geocode more easily at scale:
def geocode_from_title(title_string, original_ll):
'''
Geocodes a collection item from the title and calculate the distance between that and the on-record coordinates.
Args:
title_string (str): The name of the item in the collection.
original_ll (list): The known coordinates of the item, with latitude in position 0 and longitude in position 1.
Returns:
dict: A dictionary containing the generated latlong, the distance from the original, and self-score of the geocoder.
'''
location = geolocator_arcgis.geocode(title_string)
generated_ll = [location.latitude, location.longitude]
distance_from_original = geodesic(generated_ll, original_ll)
return {"generated_latlong": generated_ll, "distance": distance_from_original.km, "score": location.raw["score"]}
And try it out:
for item in austin_dataset.values():
time.sleep(3)
try:
geocoding_data = geocode_from_title(item["title"], item["latlong"])
except Exception as e:
print(e)
continue
austin_dataset[item["id"]] = (austin_dataset[item["id"]] | geocoding_data)
pd.DataFrame(austin_dataset).T
| latlong | id | title | generated_latlong | distance | score | |
|---|---|---|---|---|---|---|
| tx0359 | [30.27267003, -97.74313362] | tx0359 | Governor's Mansion, 1010 Colorado Street, Aust... | [30.272790994622, -97.743158022754] | 0.013614 | 97.04 |
| tx1001 | [30.30692, -97.77438] | tx1001 | Laguna Gloria, 3809 West Thirty-Fifth Street, ... | [30.312159997556, -97.774339959852] | 0.580907 | 97.89 |
| tx1009 | [30.31553, -97.75898] | tx1009 | Camp Mabry, Building No. 15, 2200 West Thirty-... | [30.313756, -97.761323] | 0.299097 | 98.79 |
| tx1121 | [30.273651, -97.748102] | tx1121 | Sampson-Nalle House, 1003 Rio Grande Street, A... | [30.273860986472, -97.747774020651] | 0.039215 | 96.96 |
| tx1127 | [30.271058, -97.74736] | tx1127 | North-Evans Chateau, 708 San Antonio Street, A... | [30.271098017819, -97.747101037645] | 0.02531 | 96.96 |
| tx1158 | [30.294118, -97.787094] | tx1158 | Tom Miller Dam, Colorado River, Austin, Travis... | [30.34773, -97.79377] | 5.977893 | 84 |
But now that we have this data, we need ways to get a sense for all this data at-a-glance.
Visualizing Results#
Putting the results on a map is way to get a sense of multiple items with multiple coordinates at once. Here we can use the folium library to create a simple map for our Austin items: we’ll place blue circles over the known coordinates and orange circles over the geocoder-generated coordinates, with a line connecting coordinates of the same item. The map is interactive, and you can click on an item to see the title!
center = [30.278858032279846, -97.75045378826303] # picking a spot in Austin to center our map around
map_austin = folium.Map(location=center, max_bounds=True, zoom_start=10,
min_zoom = 10)
title = 'Geocoded and Original Coordinate Pairs for HABS/HAER/HALS items in Austin'
title_html = '''
<h3 align="center" style="font-size:16px"><b>{}</b></h3>
'''.format(title)
for key in austin_dataset.keys():
item = austin_dataset[key]
folium.CircleMarker(location=item["latlong"], radius=5, color='#2f4b7c', fill_color='#2f4b7c', tooltip=item["id"],popup=item["title"]).add_to(map_austin)
folium.CircleMarker(location=item["generated_latlong"], radius=5, color='#ff5c00', fill_color='#ff5c00', tooltip=item["id"],popup=item["title"]).add_to(map_austin)
folium.PolyLine(locations=[item["latlong"], item["generated_latlong"]], color="grey", weight=2).add_to(map_austin)
map_austin.get_root().html.add_child(folium.Element(title_html))
map_austin
Quantifying Success#
Visualizations help us tell how well the geocoder is performing, but it’s also helpful to have quantifiable metrics. The definitions and descriptions for these formulas are below, but no need to understand them completely–these are the most complicated formulas you will see in this notebook.
The accuracy metric can be thought of as an averaged score out of 100 that is inverse to distance: as average distances increase, this metric will go down. Each item is given an “accuracy score,” equal to 100 minus the distance, in kilometers. If the distance is greater than 100km, the score for that item is 0, which helps stop outliers from throwing off the metric. All the scores are then averaged in order to create one number that grades the set of items as a whole.
The threshold score can be thought of as a more picky metric: given a threshold (the default is 1km), an item will get a point if the distance is within that threshold, and no points if it is outside of it. The score is totalled for all items and then averaged to be out of 100.
def find_accuracy(distance_list):
"""
Gives an accuracy score (0-100), which represents how close on average the generated
coordinates are to the known coordinates, discounting outliers.
Args:
distance_list (list): A list of distances between generated and known coordinates.
Returns:
float: Accuracy score, rounded to two decimal points.
"""
accuracy_scores = []
for dist in distance_list:
accuracy_scores.append(100-min(100, dist))
return round(sum(accuracy_scores)/len(accuracy_scores), 2)
def find_threshold_score(distance_list, precision_threshold=1):
"""
Gives a threshold score (0-100), which represents the percentage of generated coordninates
that are within x kilometers of the known coordinates, where x is the precision threshold and
defaults to 1.
Args:
distance_list (list): A list of distances between generated and known coordinates.
Returns:
float: Precision threshold score, rounded to two decimal points.
"""
points = 0
for dist in distance_list:
if dist <= precision_threshold:
points +=1
return round(points/len(distance_list) * 100, 2)
Another important thing to note about these metrics is that they are somewhat arbitrary. They are effective tools for measurement as long as they are used consistently. Let’s test them out on our Austin dataset–first, we’re going to do a quick list comprehension, which in this case is just a shorthand way of reshaping the data into the form we need:
austin_distances = [x["distance"] for x in austin_dataset.values()]
austin_distances
[0.013613803659473228,
0.5809067159561351,
0.2990966293351942,
0.03921496547362399,
0.02530994667505435,
5.977892510243386]
find_accuracy(austin_distances)
98.84
find_threshold_score(austin_distances)
83.33
Larger Scale Geocoding Results and Analysis#
Focusing on just one area is fun, but if we want to really dive into the analysis, we should look at all ~12,000 items for which we have known coordinates. Remember that this is still just a subset of all 46,000+ items in the collection! Geocoding a larger number of items can be done following the same process above, but the code will take a few hours to run, so here’s a file that was prepared ahead of time that we can use to look at the results:
with open("complete_geocoding_results.json", "r") as file:
data = json.load(file)
print(len(data))
12446
Data Cleaning#
Now, we’re going to take a moment to do some data cleaning that hasn’t been done yet for this dataset. If an error occured inside the geocoding function, there may be no generated_latlong field, or the value in that field might be None. In these cases we want to remove this items from our analysis in order to be able to perform consistent operations on all items.
data_clean = {}
for key in data.keys():
item = data[key]
if "generated_latlong" not in item or item["generated_latlong"] is None:
continue
if "latlong" not in item or item["latlong"] is None:
continue
else:
data_clean[key] = item
print(len(data_clean))
12351
Metrics#
Now, we’re going to do another list comprehension to get just the distances, so we can take our accuracy and threshold score metrics:
all_distances = [x["distance"] for x in data_clean.values()]
print(find_accuracy(all_distances), find_threshold_score(all_distances))
93.99 59.1
Our accuracy metric is almost 94%, not bad! And the threshold score for items within 1km is almost 60%.
We can also look at the threshold score for items within 5km:
find_threshold_score(all_distances, 5)
79.92
Almost 80%!
Other metrics we can look at are the average distance and the median distance:
sum(all_distances)/len(all_distances)
68.50433757843625
The average distance, around 70 kilometers, is pretty high, but note that outliers are liable to skew the average quite easily. We can balance this by looking at the median distance as well:
statistics.median(all_distances)
0.5505935193385619
The median distance is only .55 km!
Analysis#
Now let’s dive further into analysis. Note that this is another great place to take this notebook as a jumping-off point rather than a report–we encourage you to play around with different inputs if you are running this notebook locally. There is lots to be done here: you could try removing outliers to see how that affects the shape of the data, or focusing only on results from a certain state, or anything else that comes to mind as interesting to explore.
Geocoder Score Analysis#
Let’s see if the geocoder’s self-reported scores are good enough to tell us which geocoder results are likely to be correct. To test this, we’ll see how closely they correspond to the distances between the known and generated coordinates. Then, we’ll plot them on a graph and calculate the statistical correlation, which tells us how closely the scores align to the distances.
scores = pd.Series([x["score"] for x in data_clean.values()])
distances = pd.Series([x["distance"] for x in data_clean.values()])
df = pd.DataFrame({"Score": scores, "Distance (in km)": distances})
fig = px.scatter(df, x="Score", y="Distance (in km)", title="Comparison of Distances and Geocoder Scores")
fig.show()
Well, that graph looks sort of all over the place. Let’s try checking outright for a correlation:
scores.corr(distances)
-0.03786935889364175
There’s a very slight negative correlation, meaning that as scores go up, distances go down, but only slightly–that relationship is not strong.
Another thing to note from the above graph is that the score of 80 seems to have a large number of outliers. It’s hard to tell if this is simply because 80 is the most frequent score. We can look at a count of which scores appear the most frequently to clarify this:
fig = px.histogram(x=scores, title="Distribution of Geocoder Scores")
fig.update_layout(xaxis_title="Score", yaxis_title="Count")
fig.show()
As suspected, 80 is the most common score–by a longshot. Without knowing the exact algorithm that the geocoder is using to calculate these scores, it’s hard to draw any firm conclusions here–but these observations are certainly interesting to consider!
Title Length Analysis#
Let’s try a new measure. Remember how earlier we got better results by putting in less words? Let’s compare the number of words in the title to the distance:
title_length = pd.Series([len(x["title"].split()) for x in data_clean.values()])
df = pd.DataFrame({"Number of Words in Title": title_length, "Distance (in km)": distances})
fig = px.scatter(df, x="Number of Words in Title", y="Distance (in km)", title="Comparison of Distances and Title Length")
fig.show()
Let’s check the correlation again:
title_length.corr(distances)
0.020747552050266144
This correlation is even weaker than the last one we looked at, but it is slightly positive, meaning as the titles length goes up, distances tend to be further as well. For more context, let’s take a look at the distribution of title lengths:
fig = px.histogram(x=title_length, title="Distribution of Title Lengths")
fig.update_layout(xaxis_title="Number of Words in Title", yaxis_title="Count")
fig.show()
This distribution is underlying the initial graph, and helps us to understand part of why there might not be a strong correlation: after about 35 words, the number of items is much lower, so it might obfuscate any sort of linear relationship.
Rural/Urban Analysis#
One interesting research question is whether the geocoder tends to perform better in urban areas than in rural areas. To answer this question, we are going to need a bit more data!
We are going to use the USDA’s Rural Urban Continuum Codes (RUCC) in order to associate each item we’ve geocoded with a ruralness level. For more information on this data, check out their documentation. Essentially, counties are assigned a code 1-9, with 1-3 representing metro areas and 4-9 representing nonmetro areas, in order of descending population. However, the nonmetro areas are also designated by whether or not they are adjacent to a metro area–so while the codes for 4 and 5 have the same population, 5 is not adjacent to a metro area whereas 4 is. Here is a helpful breakdown:
RUCC |
Metro/Nonmetro |
Population |
Adjacent/Not adjacent |
|---|---|---|---|
1 |
Metro |
1 million or more |
– |
2 |
Metro |
250,000 to 1 million |
– |
3 |
Metro |
fewer than 250,000 |
– |
4 |
Nonmetro |
20,000 or more |
adjacent |
5 |
Nonmetro |
20,000 or more |
not adjacent |
6 |
Nonmetro |
5,000 to 20,000 |
adjacent |
7 |
Nonmetro |
5,000 to 20,000 |
not adjacent |
8 |
Nonmetro |
fewer than 5,000 |
adjacent |
9 |
Nonmetro |
fewer than 5,000 |
not adjacent |
In order to use the RUCC designation, we first have to determine the FIPS county code–a unique identifier for each county–for each item we have geocoded. To do this, we can use the U.S. Census API, and provide the coordinates. Here’s a function that will handle that process, and default to None if there is no associated county:
def get_county_fips(latlong):
"""
Returns the county FIPS for a given latlong according, or None if it cannot be successfully matched to a county code.
Args:
latlong (list): A coordinate in format: latitude, longitude.
Returns:
str or None: FIPS code.
"""
try:
response = s.get(f"https://geo.fcc.gov/api/census/block/find?latitude={latlong[0]}&longitude={latlong[1]}&format=json").json()
except:
return None
if response["status"] == "error":
return None
return response["County"]["FIPS"]
**Note because of a recent change (as of 2023) to the way Connecticut classfies counties, the Connecticut FIPS from the census data, which is from 2020, will not align with the FIPS from the RUCC, which is from 2023. Therefore the Connecticut data will be missing from the following analysis.
Now, let’s prepare by reading in the USDA RUCC file, and creating a dictionary that will allow us to easily look up the ruralness code using the FIPS:
import csv
import shlex
fips_dict = {}
with open('Ruralurbancontinuumcodes2023.csv', 'r', newline='') as f:
reader = csv.reader(f, delimiter=',')
next(reader) # toss headers
for line in reader:
fips_dict[line[0]] = line[4] + " -- " + line[5]
And create a simple helper function to help us get the RUCC designation from this dictionary:
def get_ruralness(fips):
"""
Returns the RUCC designation for a given county FIPS code.
Args:
fips (str): FIPS code.
Returns:
str or None: RUCC designation.
"""
if fips in fips_dict:
return fips_dict[fips]
else:
return None
Now’s time to put it all together–for each item, we want to calculate the FIPS and then grab the associated RUCC designation. However, since running the get_county_fips function for every item in our data will take about 20 minutes, we have included the results of running the function under the “FIPS” field of our prebaked data! Note that we used the original/known latlong to calculate the FIPS, and that in some cases the FIPS value will be None:
ruralness_sorted_data = {}
for item in data_clean.values():
known_county_fips = item["FIPS"]
if known_county_fips == None:
continue
ruralness = get_ruralness(known_county_fips)
if ruralness == None:
continue
if ruralness in ruralness_sorted_data:
ruralness_sorted_data[ruralness].append(item)
else:
ruralness_sorted_data[ruralness] = [item]
total_length = 0
for array in ruralness_sorted_data.values():
total_length += len(array)
total_length
12040
Note that the total number of items here is smaller for the reasons mentioned above–when we cannot identify a county or RUCC designation, we are dropping it from this collection entirely.
Let’s try looking at the accuracy and threshold score across each RUCC designation–we’ll also include N, the number of items in that category:
ruralness_table_data = {}
for key in sorted(ruralness_sorted_data.keys()):
distance_array = [x["distance"] for x in ruralness_sorted_data[key]]
ruralness_table_data[key] = {"Number of Items": len(distance_array), "Accuracy": find_accuracy(distance_array), "Threshold Score": find_threshold_score(distance_array)}
pd.DataFrame(ruralness_table_data)
| 1 -- Metro - Counties in metro areas of 1 million population or more | 2 -- Metro - Counties in metro areas of 250,000 to 1 million population | 3 -- Metro - Counties in metro areas of fewer than 250,000 population | 4 -- Nonmetro - Urban population of 20,000 or more, adjacent to a metro area | 5 -- Nonmetro - Urban population of 20,000 or more, not adjacent to a metro area | 6 -- Nonmetro - Urban population of 5,000 to 20,000, adjacent to a metro area | 7 -- Nonmetro - Urban population of 5,000 to 20,000, not adjacent to a metro area | 8 -- Nonmetro - Urban population of fewer than 5,000, adjacent to a metro area | 9 -- Nonmetro - Urban population of fewer than 5,000, not adjacent to a metro area | |
|---|---|---|---|---|---|---|---|---|---|
| Number of Items | 5684.00 | 1950.00 | 1400.00 | 780.00 | 269.00 | 550.00 | 416.00 | 550.00 | 441.00 |
| Accuracy | 97.35 | 94.52 | 92.27 | 93.00 | 93.17 | 94.29 | 90.34 | 91.21 | 89.47 |
| Threshold Score | 67.08 | 57.90 | 54.36 | 53.46 | 47.21 | 57.45 | 43.99 | 46.91 | 41.72 |
Now let’s make another map, with different layers for each RUCC designation. This allows us to look at the rural and urban breakdown in a visual and interactive way, as each layer can be toggled on and off. All layers are toggled on to start, and as a result, the map may take a few moments to load. Same as our earlier map, blue dots represent original known coordinates, and orange dots represent geocoder-generated coordinates, with gray lines connecting coordinates for the same item. Clicking on a dot will show a popup with the item title.
center = [35.481918, -97.508469] # picking a spot in the midwest to center our map around
map_hhh = folium.Map(location=center, max_bounds=True, zoom_start=3,
min_zoom = 2)
title = 'Geocoded and Original Coordinate Pairs in HABS/HAER/HALS by RUCC Designation'
title_html = '''
<h3 align="center" style="font-size:16px"><b>{}</b></h3>
'''.format(title)
for key in sorted(ruralness_sorted_data.keys()):
data = ruralness_sorted_data[key]
group = folium.FeatureGroup(key).add_to(map_hhh)
for item in data:
folium.CircleMarker(location=item["latlong"], radius=1, color='#2f4b7c', fill_color='#2f4b7c', tooltip=item["id"],popup=item["title"]).add_to(group)
folium.CircleMarker(location=item["generated_latlong"], radius=1, color='#ff5c00', fill_color='#ff5c00', tooltip=item["id"],popup=item["title"]).add_to(group)
folium.PolyLine(locations=[item["latlong"], item["generated_latlong"]], color="grey", weight=1).add_to(group)
folium.LayerControl().add_to(map_hhh)
map_hhh.get_root().html.add_child(folium.Element(title_html))
map_hhh
Threshold Score Analysis#
Let’s take a look at some different threshold scores so that we can create a bar chart which shows the percent of items that fall within each range of distances:
threshold_breakdown = []
threshold_breakdown.append(find_threshold_score(distances, 1) - find_threshold_score(distances, 0))
threshold_breakdown.append(find_threshold_score(distances, 5) - find_threshold_score(distances, 1))
threshold_breakdown.append(find_threshold_score(distances, 10) - find_threshold_score(distances, 5))
threshold_breakdown.append(find_threshold_score(distances, 20) - find_threshold_score(distances, 10))
threshold_breakdown.append(find_threshold_score(distances, 50) - find_threshold_score(distances, 20))
threshold_breakdown.append(find_threshold_score(distances, 100) - find_threshold_score(distances, 50))
threshold_breakdown.append(find_threshold_score(distances, 1000000) - find_threshold_score(distances, 100))
labels = ["0 to 1km", "1 to 5km", "5 to 10km", "10 to 20km", "20 to 50km", "50 to 100km", "100km and more"]
nums = threshold_breakdown
x = ["", "", "", "", "", "", ""]
df = pd.DataFrame({"Distance": labels, "Percentage": nums, "x": x})
fig = px.bar(df,
y=x,
x='Percentage',
color='Distance',
title='Percentage of items with distances within each range',
barmode='relative',
text_auto=True)
fig.update_xaxes(showline=False,showgrid=False)
fig.update_layout(yaxis_title=None)
fig.show()
And, for one last bonus map, let’s use these ranges as the grouping mechanism. For this map, we are just showing a static image of the first layer (the group containing distances between 0 and 1km) to conserve time and file size, but if you are running it locally, you can call the interactive version into view by adding map_hhh to the end of the next code block.
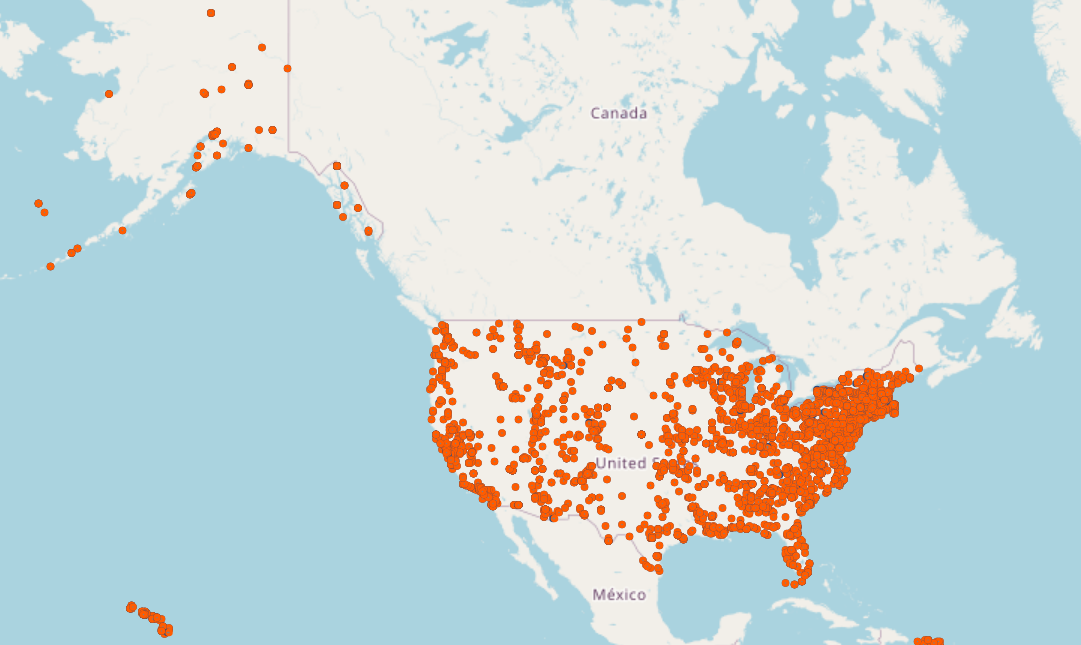
distance_sorted_data = {"0 to 1km": [] , "1 to 5km": [], "5 to 10km": [], "10 to 20km": [], "20 to 50km": [], "50 to 100km": [], "100km and more": []}
for item in data_clean.values():
dist = item["distance"]
if dist < 1:
distance_sorted_data["0 to 1km"].append(item)
elif dist < 5:
distance_sorted_data["1 to 5km"].append(item)
elif dist < 10:
distance_sorted_data["5 to 10km"].append(item)
elif dist < 20:
distance_sorted_data["10 to 20km"].append(item)
elif dist < 50:
distance_sorted_data["20 to 50km"].append(item)
elif dist < 100:
distance_sorted_data["50 to 100km"].append(item)
else:
distance_sorted_data["100km and more"].append(item)
center = [35.481918, -97.508469] # picking a spot in the midwest to center our map around
title = 'Geocoded and Original Coordinate Pairs in HABS/HAER/HALS'
title_html = '''
<h3 align="center" style="font-size:16px"><b>{}</b></h3>
'''.format(title)
map_hhh = folium.Map(location=center, max_bounds=True, zoom_start=3,
min_zoom = 2)
for key in distance_sorted_data.keys():
data = distance_sorted_data[key]
if key == "0 to 1km":
group = folium.FeatureGroup(key, show=True).add_to(map_hhh)
else:
group = folium.FeatureGroup(key, show=False).add_to(map_hhh)
for item in data:
folium.CircleMarker(location=item["latlong"], radius=1, color='#2f4b7c', fill_color='#2f4b7c', tooltip=item["id"],popup=item["title"]).add_to(group)
folium.CircleMarker(location=item["generated_latlong"], radius=1, color='#ff5c00', fill_color='#ff5c00', tooltip=item["id"],popup=item["title"]).add_to(group)
folium.PolyLine(locations=[item["latlong"], item["generated_latlong"]], color="grey", weight=1).add_to(group)
folium.LayerControl().add_to(map_hhh)
map_hhh.get_root().html.add_child(folium.Element(title_html))
<branca.element.Element at 0x29eefada3d0>
Conclusions and Takeaways#
The method used in this notebook for geocoding is not the only one possible for geocoding this collection. Using the titles, with plain text descriptions, as the sole input for a geocoder is somewhat pushing the bounds of geocoding, especially when that title might not contain an address in a form that the geocoder would expect. The use of natural language processing tools in combination with geocoding methods would be worth exploring, as would be other methods for parsing address information from these items.
Another important thing to remember in looking at the big picture here is that the 12,000 or so items in this notebook are still only a subset of the 46,000 items in the collection! And every single item is not just a metric or a set of coordinates, it’s something with historical significance. What would it mean to geocode items in this collection for which we do not have baseline known coordinates? What threshold scores and accuracy would be high enough to feel confident in mapping the entire collection?
This project was based loosely around the idea that the most important requirement before geocoding unknown coordinates in this collection would be the ability to predict the range of outcomes. If we could say “If the item is in a metro area, we’re 95% certain the geocoder is correct, but it may be up to 10 km off,” that would be much more valuable than a piece of code that provides a coordinate with no easy way of checking if it is correct.
This project exists to be questioned, to inspire, and to be built upon. It encourages interaction with the incredible HABS/HAER/HALS collection, and would not be possible without the work the National Park Service has done to manually geocode these items, in a much more impressive process than the one outlined here.